- ×
html5 game engine optimized for rapid development
Filed under gamesShow All
canvas-based game engine and toolchain optimized for rapid development.
Features
- Automatically creates a spritesheet for your assets and then loads the assets at runtime.
- Provides API for drawing animated sprites in a canvas
- Supports anchor points and rotation
- Write code in JavaScript or other compile-to-javascript languages such as Coffee-Script.
- Uses browserify to compile
your code which allows you to harness the power of code on npm.
- Wiki Article: Useful npm packages for games
- Allows you to organize code modules using
requireandmodule.exportssyntax.
- Everything from code to spritesheet is compiled automatically when you save.
- Handles main loop and frame skipping.
- API for keyboard and mouse input.
Featured Game Demos


Usage
# install dependencies in ubuntu
# for other OSes see https://github.com/LearnBoost/node-canvas/wiki/
sudo apt-get install libcairo2-dev

# start with a nearly-empty project, such as a freshly created project
# from github with only a .git/ and README.md.
cd my-project

# use npm init to create a package.json file so that we can install
# dependencies locally instead of globally.
# feel free to mash enter through the series of questions.
npm init

# init the project with chem-cli
npm install chem-cli
./node_modules/.bin/chem init

# the `dev` command will run a development server which will automatically
# recompile your code, generate your spritesheets, and serve your assets.
npm run dev

# see more commands
./node_modules/.bin/chem
See chem-cli for more information.
Synopsis
Layout
Source files
./chemfile.js
./src/main.js
./public/index.html
./assets/img/ship.png
./assets/img/explosion/01.png
...
./assets/img/explosion/12.png
Generated files
./public/main.js
./public/spritesheet.png
./public/animations.json
./src/main.js
var chem = require("chem");
var v = chem.vec2d;
var ani = chem.resources.animations;
var canvas = document.getElementById("game");
var engine = new chem.Engine(canvas);
engine.showLoadProgressBar();
engine.start();
canvas.focus();

chem.resources.on('ready', function () {
  var batch = new chem.Batch();
  var boom = new chem.Sound('sfx/boom.ogg');
  var ship = new chem.Sprite(ani.ship, {
    batch: batch,
    pos: v(200, 200),
    rotation: Math.PI / 2
  });
  var shipVel = v();
  var rotationSpeed = Math.PI * 0.04;
  var thrustAmt = 0.1;
  var fpsLabel = engine.createFpsLabel();
  engine.on('update', function (dt, dx) {
    ship.pos.add(shipVel);

    // rotate the ship with left and right arrow keys
    var rotateAmt = rotationSpeed * dx;
    if (engine.buttonState(chem.button.KeyLeft)) ship.rotation -= rotateAmt;
    if (engine.buttonState(chem.button.KeyRight)) ship.rotation += rotateAmt;

    // apply forward and backward thrust with up and down arrow keys
    var thrust = v.unit(ship.rotation).scale(thrustAmt * dx);
    if (engine.buttonState(chem.button.KeyUp)) shipVel.add(thrust);
    if (engine.buttonState(chem.button.KeyDown)) shipVel.sub(thrust);

    // press space to blow yourself up
    if (engine.buttonJustPressed(chem.button.KeySpace)) {
      boom.play();
      ship.setAnimation(ani.boom);
      ship.setFrameIndex(0);
      ship.on('animationend', function() {
        ship.delete();
      });
    }
  });
  engine.on('draw', function (context) {
    // clear canvas to black
    context.fillStyle = '#000000'
    context.fillRect(0, 0, engine.size.x, engine.size.y);

    // draw all sprites in batch
    batch.draw(context);

    // draw a little fps counter in the corner
    fpsLabel.draw(context);
  });
});
./chemfile.js
// the main source file which depends on the rest of your source files.
exports.main = 'src/main';

exports.spritesheet = {
  // you can override any of these in individual animation declarations
  defaults: {
    delay: 0.05,
    loop: false,
    // possible values: a Vec2d instance, or one of:
    // ["center", "topleft", "topright", "bottomleft", "bottomright",
    //  "top", "right", "bottom", "left"]
    anchor: "center"
  },
  animations: {
    boom: {
      // frames can be a list of filenames or a string to match the beginning
      // of files with. If you leave it out entirely, it defaults to the
      // animation name.
      frames: "explosion"
    },
    ship: {}
  }
};
./public/index.html
<!doctype html> <html> <head> <title>Chem Example</title> </head> <body style="text-align: center"> <canvas id="game" width="853" height="480"></canvas> <p>Use the arrow keys to move around and space to destroy yourself.</p> <script type="text/javascript" src="main.js"></script> </body> </html>More Demo Projects Using Chem
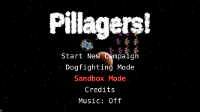
- Planetarius - Networked multiplayer arcade shooter, made in 48 hours.
- Lemming - Use your own dead bodies to beat side-scrolling platformer levels. Made in 7 days.
- Meteor Attack - dodge meteors in space
- Disinfecticide - use extreme measures to control a deadly disease outbreak.
- holocaust - rebuild society after a nuclear holocaust ravages the world
- Dr. Chemical's Lab - puzzle game that should have been an action game.
Developing With Chem
Chemfile
Start by looking at your
chemfile. This file contains all the instructions on how to build your game.This file, like every other source file in your game, can be in any compile- to-JavaScript language (including JavaScript itself) that you choose.
main- this is the entry point into your game. Chem will use browserify with this as the input file. Often this is set tosrc/main.js.spritesheetdefaults- for each animation, these are the default values that will be used if you do not specify one.animations- these will be available when you create a sprite.anchor- the "center of gravity" point.posis centered here, and a sprite'srotationrotates around this point. Use a Vec2d instance for this value.frames- frames can be a list of filenames or a string to match the beginning of files with. if you leave it out entirely, it defaults to the animation name.delay- number of seconds between frames.loop- whether an animation should start over when it ends. You can override this in individual sprites.
autoBootstrap- set this tofalseif you do not want public/bootstrap.js to be auto generated.
If you leave the
spritesheetexport undefined, no spritesheet will be generated or used at runtime.Use any "compile to JS" language
Supported languages:
- JavaScript (obviously)
- Coffee-Script
- LiveScript
- Coco
Getting Started
The first step is to require "chem":
var chem = require('chem');

// Next, locate your canvas:
var canvas = document.getElementById("the-canvas-id");

// Create the main game engine:
var engine = new Engine(canvas);

// Display a nice loading progress bar while we serve assets:
// (it automatically goes away once loading is complete)
engine.showLoadProgressBar()

// Start the main loop:
engine.start()

// Focus the canvas so that keyboard input works:
canvas.focus()

// Finally, wait until resources are done loading:
chem.resources.on('ready', function() {
  // Now you can go for it. All asssets are loaded.
});
Vec2d Convention
As a convention, any
Vec2dinstances you get from Chem are not clones. That is, pay careful attention not to perform destructive behavior on theVec2dinstances returned from the API.Resource Locations
Text files placed in public/text/ will be available in the
chem.resources.textobject once the 'ready' event has fired.Image files placed in public/img/ will be available in the
chem.resources.imagesobject once the 'ready' event has fired.Reference API Documentation
See doc/api.md.
History / Changelog
See doc/history.md.